Lab Manual
Contents
Lab Manual
Anatomy
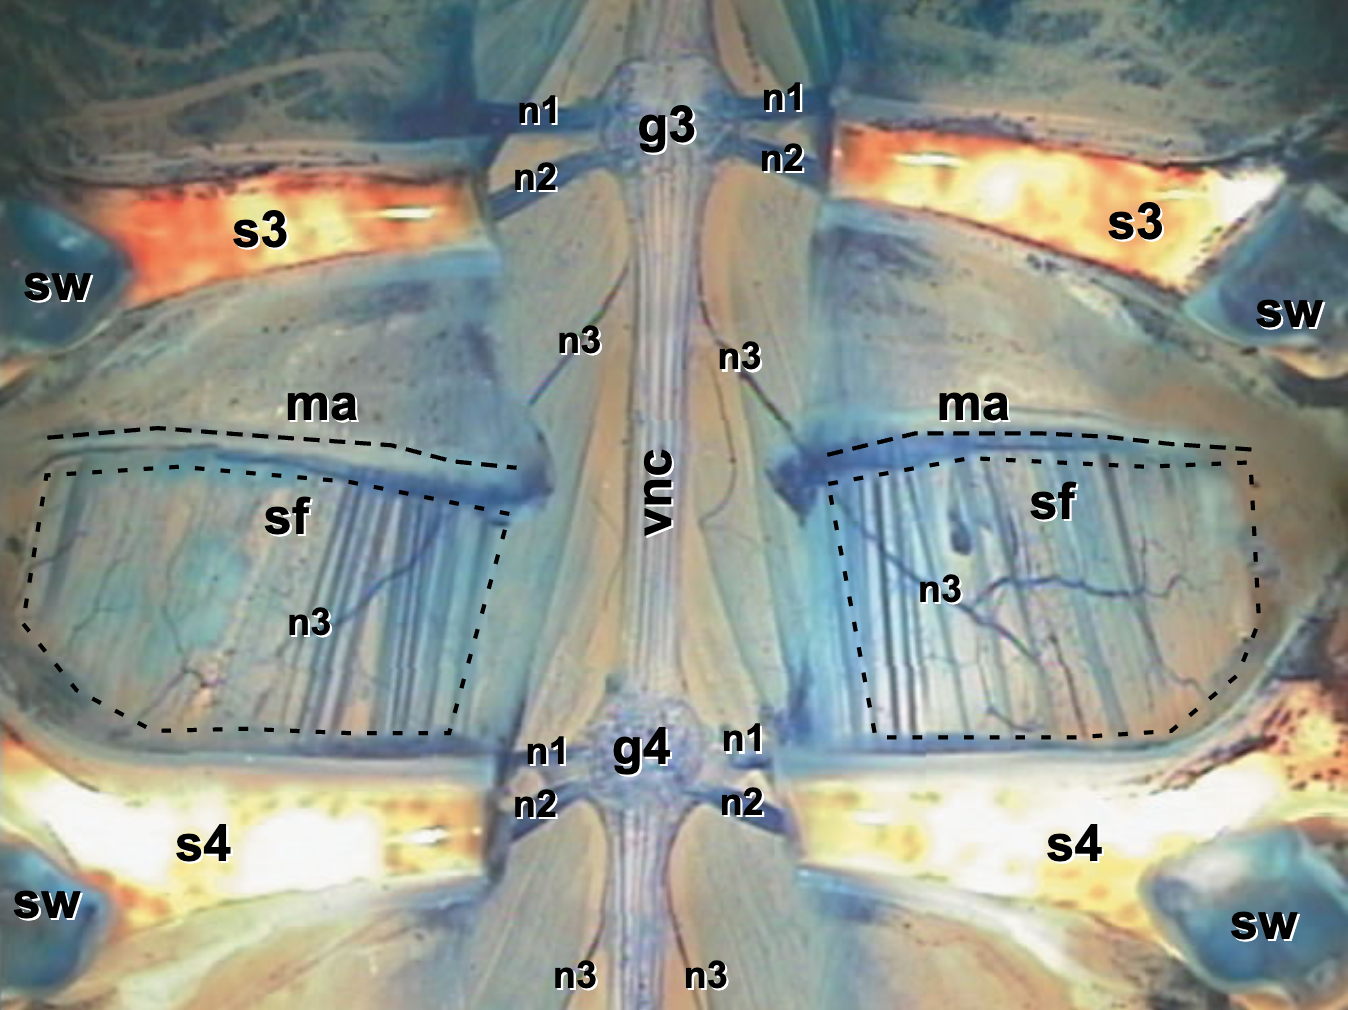
Fig. 32 Abdominal Segment (ventral view) after dissection and staining with methylene blue. Note the ventral nerve cord (vnc), ganglia of the 3rd and 4th segments (g3, g4), nerves (n1, n2, n3), and the superficial flexor muscle (sf) with its attachment point (ma). You will not have methelene blue staining in your preparations (it disrupts nerve activity), but this image with the staining should help orient you to the unstained tissue.
Hardware and Software Setup
The bonsai script for today has two measurement nodes.
Channel 01 (AI0) receives amplified (1000x) input from the extracellular suction electrode (referenced to a “ground” in the saline bath).
For the extracellular N3v recording, use a differential amplifier with 1000x gain and ~100Hz high pass filter and ~10kHz low pass filter. We will use either the Backyard Brains or the P-15 amplifiers for this.
Channel 12 (AI3) receives amplified (10x) input from the intracellular sharp electrode (referenced to a “ground” in the saline bath).
For the intracellular superficial flexor muscle recording, use a single-ended DC amplifier with 10x gain and ~10kHz low pass filter. We will use the Getting Model 5/5A amplifiers for this.
Use a sampling rate of 40kHz. Adjust the voltage range for each channel in the AnalogInput parameters to maximize the signal resolution if needed based on your nerve cord recordings (options include: ±0.2 V, ±1 V, ±5 V, ±10 V). Adjust the buffering samples according to your visualization preferences. I recommend starting with ±5 V RSE for AI0 and ±2 V RSE for AI3.
Physiology Setup
Place the extracellular measurement electrode
I recommend getting a clean N3v signal from the suction electrode before trying for any intracellular recordings. The extracellular access is more stable than the intracellular access will be. If you penetrate a superficial muscle cell before getting a nerve recording, you are more likely to lose the intracellular recording in the process (compared to getting the nerve recording first).
It is usually best to have the manipulator for the intracellular electrode on the same side as the muscle and the manipulator for the nerve on the opposite side. However, depending on your angle of access, other orientations can work. Critically, make sure that the two electrodes will not interfere with each other. Rotate the preparation dish to get a good orientation.
Clamp a suction electrode firmly in a micromanipulator, attach its measurement and reference electrode connections to the amplifier’s input. Reference (“tie”) the differential amplifier reference electrode to amplifier ground.
Select a suction electrode tip (and/or make a fresh one) with a tip diameter approximately twive the diameter of the nerve (because you will be sucking up a loop of the nerve rather than a cut end. Getting a tight fit will drastically improve your measurement quality of neural activity.
Lower the manipulator so that the tip of the electrode is in the saline (not too close to the nerve or other tissue). Gently draw some saline into the electrode; you need to have a continuous column of saline (no bubbles!) that is long enough to reach the electrode’s internal wire (a few cm).
Place a reference electrode (connected to the ground input) in the saline bath.
Disable the Matrix Writer node. Start the Bonsai protocol. Use the Bonsai protocol to monitor the success of your suction electrode.
Move the tip of the suction electrode toward the nerve about half-way between the ventral nerve cord and the muscle. The nerve should have some slack in it (it should not be fully taught).
Suction up a loop of the nerve. If successful, you should not see action potentials in your signal from the differential amplifier (ch 0).
Enable the Matrix Writer node to record the following two sets of data:
Data 1: Record approximately 2 minutes of clean spontaneous activity.
Data 2: Record spontaneous and evoked activity within the same file. Start with 1 minute of spontaneous, followed by 1 minute of gentle tail fan hair stimulation (wait 10-20 seconds between bouts of touching the hairs to avoid habituation), followed by 1 minute of gentle hair stimulation on the lateral carapace edge past where the swimmeretts attach (wait 10-20 seconds between bouts of touching the hairs to avoid habituation).
Use a non-conductive material to mechanically stimulate.
Avoid artifacts in the recorded signal by grounding yourself and moving slowly.
Place the intracellular measurement electrode
Throughout the handling and placement of the glass sharp electrodes, it is comically easy to break the sharp tip without noticing or realizing how. Avoid this. Be cautious not to touch the fine tip to anything.
Backfilling a sharp capillary electrode
Squirt a small amount of intracellular solution into the very tip of the blunt end of the electrode. Then rest the capillary on the tray (tip up so it is not touching anything) and wait for the sharp tip to fill by capillary action. You can then gently flick the capillary while holding it sharp-tip down to help bubbles rise out of the tip. Finally, use the electrode filling tip to fill backwards from the meniscus at the tip back to the blunt end (fill as much as you need to for the wire to reach the fluid, but not much more).
Clamp a pulled and filled glass capilary sharp electrode firmly in a grooved holder that is firmly clamped in a micromanipulator (sharp tip toward the prep). Thread the chlorided silver wire of the measurement electrode from the Getting Intracellular Amplifier into the blunt end of the capillary. Place a reference electrode (connected to the ground input) in the saline bath.
Sharp electrode above the bath
Disable the Matrix Writer node in Bonsai.
Start the Bonsai protocol. Use the Bonsai protocol to monitor the actions of your sharp intracellular electrode.
Use lower magnification to see the apparent sharp electrode tip above the bath as you lower it (The actual tip is too small to be seen and is somewhat lower than what you are focused on.) Gently lower the tip using the coarse manipulator controls. Keep the tip in focus as you lower it.
Continue lowering until you see or monitor that the electrode is in the bath When the electrode penetrates the surface of the saline bath, the intracellular amplifier will show a measurement of around 0 Volts (or at least register an in-range reading). You should also at this point be able to see the surface tension of the saline bath break.
Sharp electrode in the bath
“Zero”” the amplifier offset using the “Position” knob.
Check the electrode resistance using the “Electrode Check” button (red button). For every 10 MegaOhm of electrode resistance, you will observe a 100 mV change in the raw measured voltage from the intracellular amplifier.
Aim for electrode resistance of ~10-25 MOhm.
If the electrode resistance is low (<5 MOhm), the tip likely got broken.
If the electrode resistance is a little low or high, the electrode puller setting might need to be adjusted.
Placing the light source such that light comes in from the side of the preparation dish can help highlight the muscle fibers and electrode.
Sharp electrode searching for a cell
Coarse advance: Now bring the electrode closer to the muscle, refocusing along the way, until the visible part of the electrode appears to be a short distance from the muscle surface. Have your partner watch the measurement signal in Bonsai to tell you if you have gone too far (the signal will deflect from zero and get wiggly when the tip hits something). If you go too far, back up a little, re-check the electrode resistance to make sure it did not break or get clogged, and then move on to the fine advance stage.
Fine advance: At this point, looking under the microscope is no longer useful because the electrode tip is so small, it is invisible. Instead, watch the oscilloscope and use the fine-adjust knob of the manipulator to advance the electrode. When the oscilloscope trace starts to wobble slightly, the electrode is just pressing against a muscle fiber. You can either advance another quarter-turn with the manipulator or use the Buzz button on the amplifier to get into the cell. When the electrode is in a cell, the oscilloscope should indicate a negative voltage, the resting membrane potential.
Some notes
Be careful not to penetrate the muscle too deeply. This may break the electrode tip and damage the muscles, or it may cause you to record from deeper flexor muscles that do not experience good saline exchange.
Before penetrating a muscle fiber with the electrode, be sure that the amplifier output is zero. Adjust the DC Offset knob of the amplifier to achieve this. To get an accurate measurement of the RP, you must do this before each recording.
Sharp electrode in a cell
If you successfully penetrate a muscle cell, the membrane potential will jump to a stable resting membrane potential. If there are excitatory post-synaptic potentials (EPSPs) in the fiber you are recording, they will appear as small (1 to 10 mV) deflections in the signal.
Not every location from which you record on the superficial flexor will show EPSP activity. To see EPSPs, you must record near a synapse. Generally, EPSPs can best be recorded in the middle of the muscle.
Stop the Bonsai protocol and Enable the Matrix Writer node.
Restart the Bonsai protocol to record simultaneous and extracellular (pre-synaptic) intracellular (post-synaptic) neural activity. About 1 minute of good-quality pre- and post-synaptic activity should be sufficient.
While recording, you can gently prod the telson hairs with a nonmetallic object (be careful not to disturb your muscle recording). This will recruit different activity and maybe reveal new classes of PSPs.
Try to minimize electrical noise by shifting the microscope over the electrodes, grounding yourself and holding your hand over the prep, placing wire mesh over the prep, etc.
Draw a diagram of the muscle from which you are recording. Record from a variety of locations, marking them on your map. At each location, note the resting potential of the muscle fiber and the filename so that you can later determine which APs match EPSPs in the fiber at that location.
Housekeeping
Clean up your area.
Copy data to an external drive or your Google Drive for later.
Use the Data Explorer notebook to process and analyse your raw data. Answer the questions in the Responses notebook. The Dash DataExplorer.py application is available to explore your raw data in detail.
- 1
RSE, ±5 V; electrode inside suction tip goes to an analog input; electrode outside suction tip (in bath) goes to AIGND (analog input ground reference).
- 2
RSE, ±2 V; electrode inside suction tip goes to an analog input; electrode outside suction tip (in bath) goes to AIGND (analog input ground reference).